Below are the plans for a versatile and inexpensive tarp project you can make.
BIVY SACK / HAMMOCK / COT
The items you’ll need for this project are:
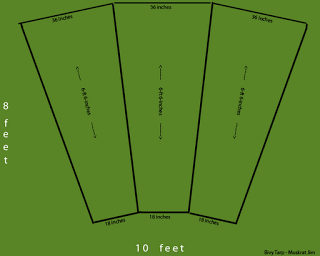
– 8’x10′ polyethylene camo tarp
– 20′ mason line (or bank line)
– 50′ para-cord
– 16′ poly rope
– duct tape
– heavy thread
– about 40 small grommets
Keep the scraps!! They will be used to make a stuff sack which will also double as a pillow.
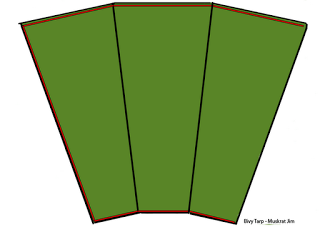
Using the red lines in Figure 2 as a guide, make a small hem around the string. This can either be taped in place and sewn later, or you can just leave it taped. The two ends of the string should be knotted or folded over to prevent the string from being pulled out of the hem.
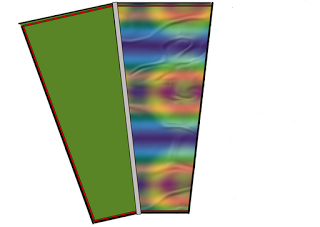
Next, fold the right panel over the center panel to the black line and tape this edge. This seam will take a lot of stress, so it should be taped on the inside of the tube as well. Additionally, this seam should be double-stitched with heavy thread if you want it to last.
Next, fold the left panel over the center panel. Tape this edge about half way up as shown in Figure 4.
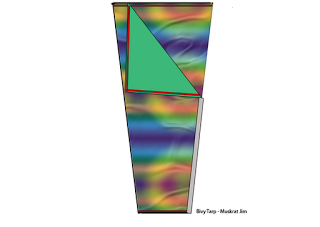
It’s only taped half way up to make it easier for you to crawl in and out of the bivy. This taped edge should be stitched as well, especially the top end and the bottom.
As it is right now, it is ready to be used as a bivy with a double layered bottom. Crawl in, pull the flap over your head, and you’re off to dreamland.
Bivy Mods
As those of you who have ever slept on a tarp will know, condensation is a problem. They are sweaty and they will stick to your exposed skin. Also, a night on the cold hard ground is no picnic either. Luckily these drawbacks can be easily addressed using the following modifications.
– Bivy liner
A liner can be easily made by folding a blanket in half and pinning it together to make a lightweight ‘sleeping bag’. This can be stuffed into the top layer of the bivy. The open top and bottom of the bivy design also allows the bivy to breathe, reducing the condensation problem.
Depending on the season, you could sew a bed sheet into the required shape and use a pillow case to cover the stuff sack. Or for colder weather, you can put a mummy-style sleeping bag into the bivy.
Additionally, you can spread half an aluminized emergency blanket in the lower compartment and hold it in place with four small pieces of duct tape. The remaining half can be taped to the inside of the top cover to reflect your body heat down towards you.
– Bushcraft mattress
By putting a series of small grommets on the edges of the bottom and middle layers of the bivy (spaced about three inches apart), you could lace the bottom of the bivy shut and stuff it full of leaves, ferns or other plants to make a bushcraft mattress. Lace up the top edge too, to keep the stuffing from falling out.
– Hammock style
For this, you’ll need two trees, some rope, and a couple of short branches about 1″ or 1-1/2″ thick.
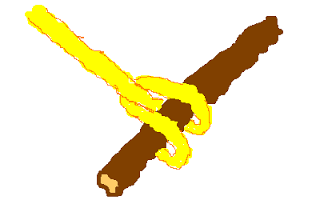
Take two 8-foot lengths of 1/2″ thick rope and tie loops to each end. These will pass through the lower section of the bivy, one on the left and one on the right. Make spreader bars using a 2-foot branch for the foot and a 3-1/2-foot branch for the head. Attach the spreader bars to the bivy ropes by making a sliding loop out of the existing loop as shown here:
Now that the spreader bars are in place at the ends of the hammock, it’s time to fasten it to a couple of trees. For this task, we can use 550 para-cord. We’ll be using four 10-foot lengths, folded in half to support each end of the spreader bars. Ten-foot lengths should do unless your trees are more than 15 feet apart. The closer the trees the less swinging you’ll do in your bivy-hammock.
Follow these instructions for each of the four support ropes:
- Fold the para-cord in half, bringing the ends together. Tie the two ends together using a simple overhand knot.
- Tie several more knots like this, spacing them about four to six inches apart up the rope.
- Wrap this rope around the tree trunk, about waist-high, passing the knotted end through the loop.
- Bring the knotted end to one end of the spreader bar.
- Temporarily slip one of the knots over the end of the spreader bar.
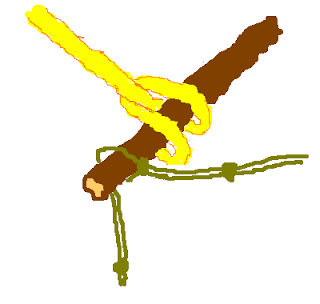
Attaching the ropes to both ends of the spreader bars in this manner removes the stress on the spreader bar and transfers the force directly to the ropes travelling through the hammock, Also, being supported at four points (instead of two) reduces the swinging motion of the hammock.
– Cot style
If hammocks aren’t your ‘thing’, you can also configure this bivy into a bed. Instead of ropes running through the bottom chamber, you can put in two long smooth poles. The ends of these poles can then be lashed to trees or supported on crossed members as shown here:
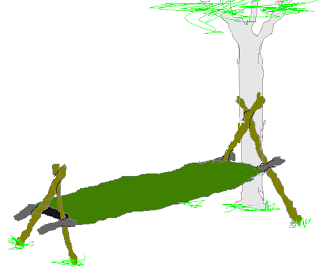
Using the scrap tarp pieces, cut a single piece 24″x24″. Make a hem along one side and include a 36″ length of para-cord in the hem. Fold this in half so the two ends of cord come together. Tie the ends of the para-cord together so they wont slip out of the hem. Sew the open long edge and the short edge opposite the para-cord end. Turn the whole thing inside out and there’s your stuff sack!To make the cot sturdier, lash the headboard to an available tree and you can use a guy-line staked to the ground for the foot. The two long poles don’t have to be lashed to the head and footboards, but it’s probably a good idea.
– Stuff sack / Pillow
To make your pillow, fill the stuff sack with leaves, pull the drawstring tight and tie it shut. Slip it into a pillow case and pleasant dreams!!
