Make this versatile and inexpensive tarp shelter for your Bivy Sack.
SHELTER FOR BIVY SACK
I like to sit sheltered with my back against a tree, so I’ve designed this shelter in that fashion. Also, this shelter only uses one tree so you can easily position it to protect you from the prevailing wind.
The items you’ll need for this project are:
– 8’x10′ camouflage tarp
– 30′ mason line (or bank line)
– 12′ thin poly rope (ridge line)
– duct tape
– heavy thread
– 12 grommets
– 11 metal tent pegs
– small carabiner
– shear curtain (optional)
– various lengths of para-cord
Tools:
– scissors
– measuring tape
– Sharpie marker
– long straight edge
– large sewing needle
– grommet kit
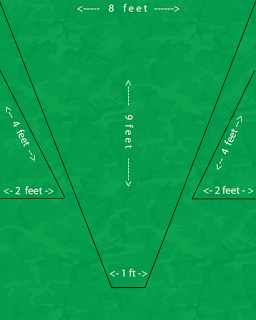
Starting with an 8’x10′ tarp, lay it camo side down and mark the tarp using the dimensions shown in Figure 1. Cut out the large trapezoid roof shape and the two smaller triangles.
These dimensions will accommodate the
Bivy Tarp Project in it’s various configurations and still leave room for your gear.
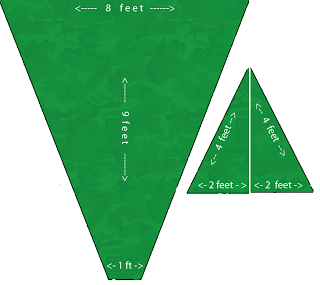
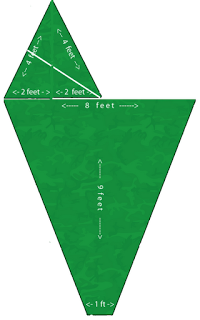
Sew the two smaller triangles together to make an equilateral triangle with four-foot sides. This will be attached to the larger piece to enclose the open end, like a wall or door.
Run Mason line along the edges and duct tape or sew a small hem around the tarp edges as we did with the
Bivy Project.
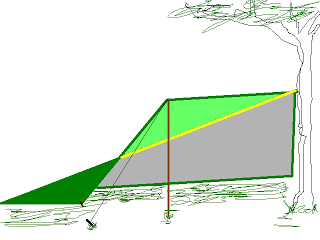
Assemble (tape or sew) the pieces as shown in Figure 3. Here the left side will be the back of the shelter and the right side can be flipped up and supported for a doorway with an awning. At night or in severe weather it can be dropped and held in place with a tent stake on the inside of the shelter.
Install five grommets along each of the two long edges, another at the foot, and one at the peak. A final grommet should be installed at the top point inFigure 3.
Prepare the Ridge Line rope with a small loop to attach to the foot tent peg, and a large two-foot loop for the peak. This loop will be in the over-head area of the sleeping compartment. It will be a convenient place to hang a carabiner, flashlight, a stow-away bag for small items, and support for the optional mosquito netting / shear curtain panel.
Set Up (for bivy mattress or severe weather)
Tie a length of para-cord (or mason line) about chest-high on a suitable tree. Run a free end of the cord through the large loop of the ridge line rope and the grommet at the peak of the shelter. Tie this tight up against the tree.
Take your longest tent peg and pass it through the grommet at the foot of the shelter and the small loop of the ridge line and pull it snug. Ideally, the tarp and ridge line should both be taut. Drive the stake into the ground at an angle to prevent it from being pulled out of the ground.
Drive the other tent stakes into the grommets to complete the shelter. The small triangular end wall should be brought around the front side of the tree for better weather proofing. Drive this tent stake in from the inside to make it easier to exit in an emergency. The tent stakes for the awning / main access can also be driven into the ground from the inside.
Set Up (for bivy hammock or cot)
First set up the bivy hammock or cot so it is a comfortable height off the ground.
Tie a length of para-cord (or mason line) about eye level on a suitable tree. Run a free end of the cord through the large loop of the ridge line rope and the grommet at the peak of the shelter. Tie this tight up against the tree.
Pass another length of cord through the grommet at the foot of the shelter and the small loop of the ridge line and pull it snug. Ideally, the tarp and ridge line should both be taut. Tie the free end to the tree supporting the foot of the hammock.
Attach guy-lines to the main grommets and peg the lines into the ground, leaving the awning open and supported by a suitable stick.
Make sure the bottom edges of the shelter are lower than the bivy to protect you from the weather. Adjust the height of the peak as necessary.
———–
I’ll put up a video and photos as soon as I can :-)